Natural Sliding Panels
Installation Instructions
Thank you for purchasing your natural sliding panels. With proper installation your shade should look beautiful and provide years of service. Please check all parts and read these instructions before starting installation. Please keep the packaging until you have installed your shade and are satisfied with it.
TOOLS THAT MAY BE REQUIRED:
Pencil, Tape Measure, Screw Driver, Step Stool, Level, and Drill
NOTE: For wallboard or plaster use anchors designed for hollow walls (not included). For concrete, stone or brick, use a masonry drill bit and anchors designed for masonry (not included).
Sliding Panel Shipments
Sliding panels are shipped in two parts:
• Panels and Valances
• Tracks
Please ensure you have both pieces of your shipment before installation.
Spliced Tracks:
If you ordered a sliding panel wider than 90 inches, the track will have been supplied to you in two pieces, with a splicing piece to join the two halves. The splicing piece will already have been installed in one half of the track [Figure 1]. Simply slide the other half of the track onto the exposed end of the splicing piece until the two halves fit snugly together [Figure 2].
Use installation brackets on either side of the splice to secure both parts of the track.
STEP 1: Install Brackets
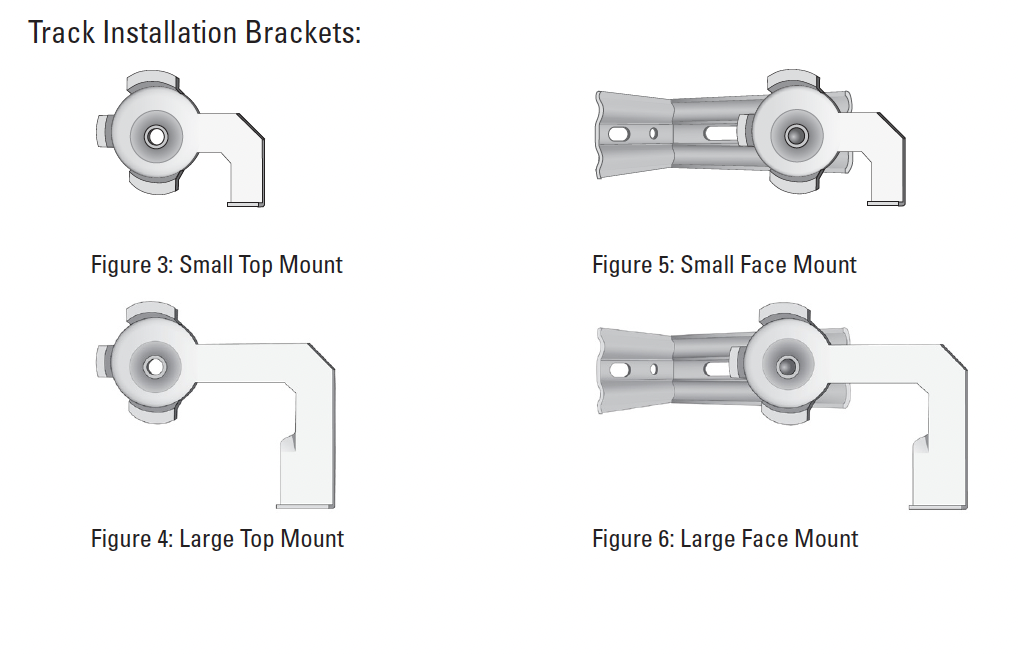
Depending on the size of your track and your mounting application, you will have received small (2-3 channel tracks) or a large (4-5 channel tracks) top or face mount swivel installation brackets [Figures 3-6].
For top mount, you will install the swivel brackets directly to the mounting surface.
- Measure 4 inches in from each end of the window and ensure you have the following clearance from the window or from any protruding window hardware:
Small Bracket: 1¼” from the hole of the bracket.
Large Bracket: 2” from the hole of the bracket.
2. Make a pencil mark through the hole in the center of the bracket.
3. Space any additional brackets evenly between the two end brackets.
4. Drill holes through the pencil marks and using the correct anchors for your mounting surface, attach the brackets to the mounting surface. The arm of the bracket should be in the open position.
For face mount, you will use L-brackets to attach the swivel to the wall.
- Mark with a pencil the desired height of the L-bracket, based on the length of panels you ordered. Then measure in 4” from the ends of the track.
- Space any additional L-brackets evenly between the two end brackets. Use a level to make sure all brackets are even. Uneven brackets may stop the brackets engaging properly with the track.
- Drill holes through the pencil marks and using the correct anchors for your mounting surface, attach the brackets to the mounting surface. The arm of the bracket should be in the open position.
STEP 2: Install Track
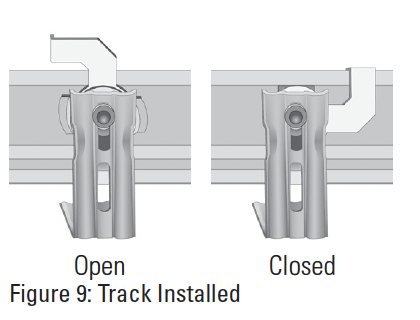
With swivel brackets in the open position, place track against the brackets and rotate the swivel right to secure the track in place [Figure 9].
STEP 3: Install Panels
Secure the panels to the hangers with the velcro provided. Take care to position the panels so that the velcro engages fully and the panel is level. Repeat with all panels [Figure 10].
STEP 4: Install Valance
Valances are installed directly to the sliding panel track with the velcro provided.
- Align the edge of the velcro on the back of the panel with the velcro on the end of one side of the track.
- Stretch the valance across the width of the track to complete the valance installation, making sure the both pieces of velcro are aligned.
Was this article helpful?
That’s Great!
Thank you for your feedback
Sorry! We couldn't be helpful
Thank you for your feedback
Feedback sent
We appreciate your effort and will try to fix the article