Installation Instructions: Natural Roller Shades
Thank you for purchasing custom Natural Roller Shades.
With proper installation, your shades should look beautiful and provide years of service. Please check all parts and review this manual before starting installation.
Note: If installing motorized shades, the motorization manual is provided separately. Please refer to that manual for instructions on programming and operating motorized shades.
Tools That May Be Required:
Pencil, Tape Measure, Drill, Screw Driver, Level and Step Stool
Shade Care and Cleaning
Because of the material content for these fabrics, steaming and spot cleaning is not recommended.
When dusting is required, be sure to use something gentle. We recommend using a vacuum brush or a duster.
Following these tips will help to extend the life of your shades and ensure that they stay beautiful for years to come.
______________________________________________________________________________________________________________
Standard Open Roll (Single Shades)
If open roll shade was ordered with a Box Valance, see box valance installation before starting installation.
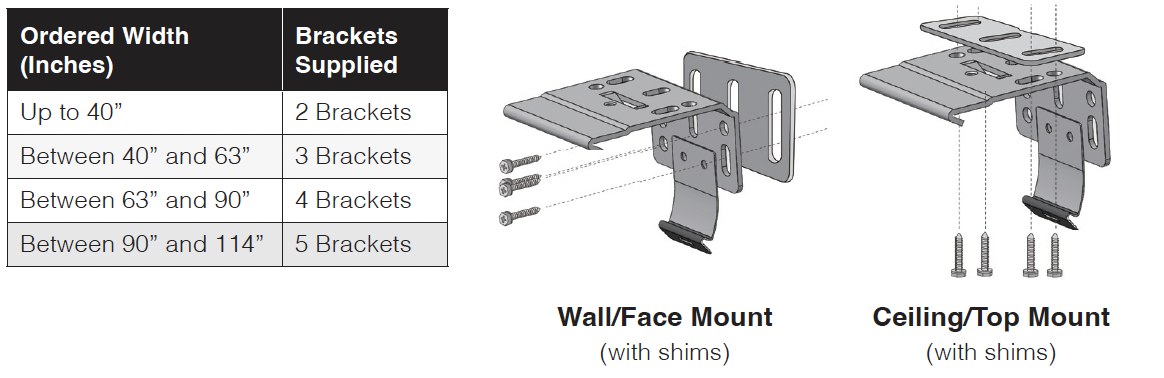
Step 1: Install Brackets
Roller shade brackets can be installed to the wall (face mount) or to the ceiling or underside of the window recess (top mount).
Determine the desired location for the brackets. Mark the position of the brackets and ensure they are the correct distance apart and that they are level and in line with each other. 
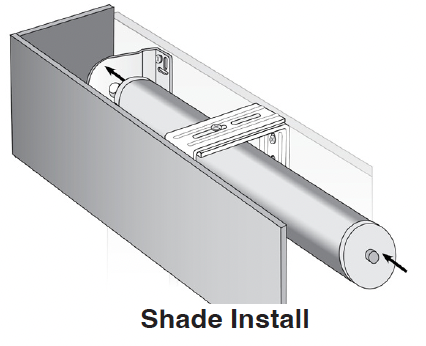
Step 2: Install Shade
Insert the control side of the shade into the control end bracket, ensuring the lug on the bracket fits into the slot. Then, push in the pin on the idle end of the shade and move the shade up so that the pin engages with the hole in the idle end bracket. When the pin snaps into the bracket, the shade is securely installed.
NOTE: Cordless open roll shades must be fully rolled on the tube before installation. If not fully rolled on the tube, the shade will not raise completely in operation. Cordless open roll brackets must also be installed at exactly the ordered width for the shade to operate properly. 
Note: Chain Tensioner Installation
Shades with clutch controls come with a continuous chain loop, which MUST be secured to the wall with the included chain tensioner.

See separate instructions for Chain Tensioner Installation.
______________________________________________________________________________________________________________
Dual Bracket (Double Shades)
If your dual shade was ordered with a Box Valance, see box valance installation before starting installation.
Step 1: Install Brackets
Dual roller shade brackets can be installed to the wall (face mount) or to the ceiling or underside of the window recess (top mount).
Determine the desired location for the brackets. Mark the position of the brackets and make sure they are the correct distance apart and that they are level and in line with each other. 
Step 2: Install Shade
Install the bottom shade followed by the top shade. The shade installed on the bottom of the bracket will always be standard roll. The shade installed on the top of the bracket will always be reverse roll.
Insert the control side of the shade into the control end bracket, ensuring the lug on the bracket fits into the slot. Then, push in the pin on the idle end of the shade and move the shade up so that the pin engages with the hole in the idle end bracket. When the pin snaps into the bracket, the shade is securely installed.
NOTE: Cordless open roll shades must be fully rolled on the tube before installation. If not fully rolled on the tube, the shade will not raise completely in operation. Cordless open roll brackets must also be installed at exactly the ordered width for the shade to operate properly.

Note: Chain Tensioner Installation
Shades with clutch controls come with a continuous chain loop, which MUST be secured to the wall with the included chain tensioner.

See separate instructions for Chain Tensioner Installation.
______________________________________________________________________________________________________________
Open Roll - Decorative Metal Brackets
Note (Wand Motor Installations): If installing brackets with wand motors, brackets must be installed top mount. Wand controls must be installed to the motor head prior to installing the wand motor control side to the bracket.
Note (Cordless Installations): Cordless open roll shades must be fully rolled on the tube before installation. If not fully rolled on the tube, the shade will not raise completely in operation. Cordless open roll brackets must also be installed at exactly the ordered width for the shade to operate properly.
Step 1: Install Brackets
1. Installation brackets are equipped to fit either the idle end or control end of your shade. 
2. The brackets can be installed to the wall (face mount) or to the ceiling or underside of the window recess (top mount).

3. Determine the location for the brackets and the mounting style. Mark the position of the brackets and confirm they are the correct distance apart. Confirm brackets are level and in line.
4. Once the brackets are installed, cover the installation screws on the foot of the bracket with screw covers.

Step 2: Install Shade
1. Insert the motor head into the control end bracket.

2. The idle end of the shade has a dial which can be turned to retract the idle end pin. Once the pin is retracted, the idle end can be aligned with the opening of the idle end bracket. Once in place, turn the dial to release the idle end pin to hold the shade in place.

3. If your shade requires removal after installation, turn the dial on the idle end to retract the idle end pin and remove the shade from the brackets.

_____________________________________________________________________________________________________________
Cassette Installation
Step 1: Install Brackets
Brackets for roller shades with cassettes can be installed to the wall (face mount) or to the ceiling or underside of the window recess (top mount).
Note: Brackets must be installed level in order for the cassette to install properly. Use the provided bracket shims if installing to uneven surfaces.
For wall/face mount, move on to INSTALL CASSETTE GRIPS.
For ceiling/top mount shades, move on to INSTALL SHADE.
WALL/FACE MOUNT ONLY: INSTALL CASSETTE GRIPS
Wall/Face mount cassettes should be installed with the provided cassette grip. Cassette grips attach to the back of the cassette and keep the cassette from tilting forward in face mount installations.
If installing wall/face mount with spacer blocks, an L-shaped spacer block is provided. Please ensure the cassette grip is positioned on top of the spacer block.
Note: Cassette grips will have a thin side and a thick side. The thin side should face the wall if the cassette brackets are installed without shims. The thick side should face the wall if the cassette brackets are installed with shims. 
Step 2: Install Shade
Position the lip of the bracket under the front rib on the top of the cassette.
Once in position, push the back of the shade up into the tab of the installation bracket. You will hear a click once the back of the cassette and tab of the bracket are engaged.

If your shade requires removal after installation, use a flat head screw driver to unhook the tab on the cassette installation bracket from the bottom of the cassette. 
Note: Chain Tensioner Installation
Shades with clutch controls come with a continuous chain loop, which MUST be secured to the wall with the included chain tensioner.

See separate instructions for Chain Tensioner Installation.
_____________________________________________________________________________________________________________
Traditional Valance
Option A: Face Mount
Step 1: Install Brackets
Center your shade on its corresponding window and mark in pencil where the slots in the head rail fall. Ensure the shade is level while marking. Position the brackets within the marked slot locations, and screw into place.
Step 2: Install Shade
Remove the wing nuts from the threaded posts and install the shade by sliding the bracket’s threaded posts through the slots in the head rail. Re-attach the wing nuts, screwing them on tightly to hold the head rail firmly in place.
Option B: Top Mount
Shades that are top mounted can be installed using the mounting bracket as outlined in Option A, or can be installed directly through the head rail by following the steps below.
Step 1: Pre-Drill Head Rail
Pre-drill holes in the shade head rail that align with the slots of the head rail.
Step 2: Install Shade
Holding the shade in place in its installation position, use the installation screws provided to screw directly through the shade head rail into the pre-drilled holes to install the shade.

_____________________________________________________________________________________________________________
Box Valance
Step 1: Install Shade Brackets
See Step 1 on single shade bracket installation or double shade bracket installation
Step 2: Install Valance Brackets (Face Mount)
See Step 1 on single shade bracket
For Top Mount, move on to Step 3.
For Face Mount, you will have received L-brackets in pairs. These will be stacked in your installation to allow the Box Valance to be installed face mount. Install the wall side L-bracket above where your shade will mount.

Step 3: Install Valance
For Top Mount, attach the L-brackets so they are aligned with the top of the inside of the valance. Install directly to the mounting surface.
For Face Mount, attach the valance side brackets so they are aligned with the top of the inside of the valance, making sure they match the placement of the wall side L-brackets. Then, install the valance by placing the valance side L-bracket on top of the wall side L-bracket and use the nut and bolt provided to hold in place.

Step 4: Install Shade
See Step 2 on page 2 for Single Shade Installation or Step 2 on page 3 for Double Shade Installation.
Note: Wide Box Valances

Wide Box Valances will be split. Use the provided flat support to connect the box valances. The provided Keystone can be used to cover the split.

Wide Box Valances will be supplied with extra L-brackets. Space all brackets evenly to provide additional support
Was this article helpful?
That’s Great!
Thank you for your feedback
Sorry! We couldn't be helpful
Thank you for your feedback
Feedback sent
We appreciate your effort and will try to fix the article