Dooya Remote Motor Programming
Order Placed Pre 6.03.2025
This guide contains basic programming instructions for the Dooya Remote motors. This programming is the same for all remote types (Multi-Channel Remote, Multi-Channel Wall Switch, Single-Channel Remote, and Single-Channel
Wall Switch).
If you need to Change Motor Speed, Copy a Remote, Turn the LED On/Off, or Turn Soft Stop On/Off, please see the article titled Dooya Advanced Motor ProgrammingThe Equipment
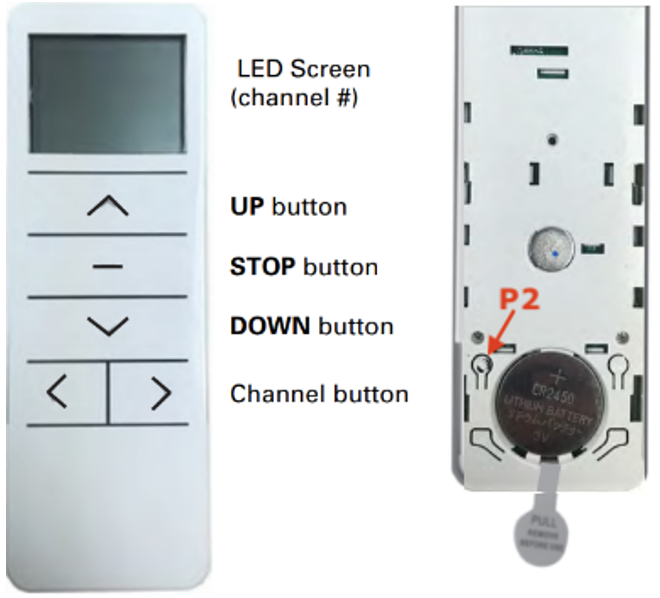
When programming motors, you need to know the equipment and buttons that are referred to in the instructions.
The Motor Head
The setting button is located on the motor head. This button is used for most of the main programming instructions. The factory typically positions the charging port facing downward to make it easy to reach for the homeowner. The setting button is rotated slightly from the charging port and looks like an old-fashioned keyhole or thermometer.

The Remote
The remote is used to acknowledge actions and set certain positions. Whether it is multi-channel or single-channel, there is a UP, DOWN, and STOP button. Also on the remote, is the P2 button that is used to confirm actions.
Basic Remote Tips:
Don’t Wait Too Long Between Key Pressings
Example: P2+UP+UP
- There is a timeout of 8 seconds between two key presses. Do not wait too long!
- Press a key, check the motor feedback (jogs or beeps), press the next key
Programming
Pairing/Unpairing
Press and hold the setting button for 2 seconds until the shade jogs once, then let go. There is a long beep. Within 20 seconds of the beep, press and release the UP button. The shade should jog twice and beep 3 times.
If the shade does not pair
- Check that the antenna is visible and not damaged.
- How far away are they from the shade?
- Are they waiting until after the beep to press the UP button?
- Is the motor charged?
- Is the motor turned on?
- There is a toggle at the end of the motor
- 1 is on and 0 is off
- Has the plastic tab been completely removed from under the battery?
- Make sure that the battery is installed correctly
- If the installer has an extra remote, ask if they can pair the motor to that one
- This will help to determine if this is a motor or remote issue
Setting Limits
For the Upper Limit – Once the shade is where you want it, press and hold the UP and STOP buttons together at the same time for 5 seconds until the shade jogs twice and beeps 3 times.
For the Lower Limit – Once the shade is where you want it, press and hold the DOWN and STOP buttons together at the same time for 5 seconds until the shade jogs twice and beeps 3 times.
If the limits are not set
- Is the remote locked?
- For a Multi-Channel Remote
- Press and Hold the STOP button for 15-20 seconds until a “U” appears on the screen.
- Press the P2 button to confirm the unlock
- For a Single-Channel Remote
- Press and Hold the STOP button for 15-20 seconds until the blue LED flashes rapidly 5-6 times
- For a Multi-Channel Remote
- Is the shade fully charged?
- Are they pressing the UP/STOP or DOWN/STOP buttons at the same time?
- Is the antenna visible and not damaged?
Factory Reset
Sometimes the best thing to do is to Factory Reset the motor. This not only unpairs the motor from the remote, but it also wipes the limits.
- To factory reset the motor, press and hold the setting button for 14 seconds. You should see 4 jogs and hear 4 beeps at the end.
Checking the Direction of the Motor
After a Factory Reset and re-pairing, please check the motor’s direction by pressing either the UP or Down.
- If the shade goes in the wrong direction, press and hold the setting button on the motor for 3 jogs.
- The shade should move in the correct direction, now.
Setting a Favorite Position
Both the Upper and Lower Limits must be set to set a Favorite Position.
- Move the shade to the desired position using the UP and DOWN buttons. Press the STOP button for 5 seconds. The shade will jog twice and beep once.
- To change the Favorite Position, repeat the same process.
Hiding/Unhiding Channels –
If a customer is not using all 15 channels of a multi-channel remote, they will sometimes want the extra channels hidden for ease of navigating the remote.
- Hold both the channel up (>) and channel down (<) buttons together for 5 seconds until the screen shows “C” and then “15”. Scroll through the channels until you reach the highest channel you want visible (ex. If you want channel 6 to be the highest visible channel, scroll to 6). Press the STOP button to confirm.
- To unhide the channels, repeat the same process. The highest channel to be visible will be 15 if you would like all the channels visible.
Hiding/Unhiding on the Multi-channel Wall Switch
- Hold both the channel up (+) and channel down (-) buttons together for 5 seconds until the screen shows “C” and then “15”. Scroll through the channels until you reach the highest channel you want visible (ex. If you want channel 6 to be the highest visible channel, scroll to 6). Press the STOP button on the right (-) to confirm. An (o) will show on the screen if you're successful.
- To unhide the channels, repeat the same process. The highest channel to be visible will be 15 if you would like all the channels visible.
Group Channels
Channel 0 is a default for all the shades on the multi-channel remote to work together. If you have excess channels on a remote, you can designate these as group channels to control certain groupings of shades. For example: you have shades programmed on channels 1, 2, 3, 4, 5, and 6, and you would like to have 1, 2, and 3 to work together and 4, 5, and 6 to work together.
- Choose any unused channel for your group
- Follow the steps for pairing a shade to pair each shade you want in the group to that channel.
- For our example, let’s choose channel 7 for the first group and channel 8 for the second.
- Make sure the remote is on channel 7
- Press and hold the setting button on the first motor for 1 jog, let go, and at the end of the long beep, press and release the UP button
- Repeat this process for each motor until shades 1, 2, and 3 are paired to channel 7
- Put the remote on channel 8
- Repeat the pairing process for each motor on shades 4, 5, and 6
- The limits are stored in the motor, so you do not need to reset them for the group channels.
Adjusting Limits
The shades will arrive from the factory with an upper and a lower limit set, but, sometimes, these limits are not right once the shade is installed in the window. When this happens, the limits can be changed as needed.
TO CHANGE THE UPPER LIMIT
Move the shade to the current upper limit.
- Press and hold the UP and STOP buttons together at the same time until the shade jogs once.
- This will put the shade in program mode so the shade will only move in small increments.
- Adjust the shade to where you would like the upper limit.
- Press and hold the UP and STOP buttons together at the same time until the shade jogs twice.
- Your new limit is now set, and the shade is out of program mode.
TO CHANGE THE LOWER LIMIT
- Move the shade to the current lower limit.
- Press and hold the DOWN and STOP buttons together at the same time until the shade jogs once.
- This will put the shade in program mode so the shade will only move in small increments.
- Adjust the shade to where you would like the lower limit.
- Press and hold the DOWN and STOP buttons together at the same time until the shade jogs twice.
- Your new limit is now set, and the shade is out of program mode.
If the shade will not jog when trying to either put the shade in program mode or save the limit:
- Are the buttons being pressed at the same time?
- Is the remote locked?
- For a Multi-Channel Remote
- Press and Hold the STOP button for 15-20 seconds until a “U” appears on the screen.
- Press the P2 button to confirm the unlock
- For a Single-Channel Remote
- Press and Hold the STOP button for 15-20 seconds until the blue LED flashes rapidly 5-6 times
- For a Multi-Channel Remote
- Is the shade fully charged?
- Is the antenna visible and not damaged?
“Sleep” Mode
This is especially useful when you have multiple shades paired to a single-channel remote and one or more shades need to have limits adjusted. To accomplish this, you will need to put the shades you are not adjusting to “sleep,” essentially turning off the radio signal.
- To put a motor to sleep
- Press and hold the setting button for 2 jogs
- To wake up the motor (turn the radio signal on)
- Lightly press the setting button
Changing the Battery in the Remote
If the LCD screen is not showing any information or the blue LED is not flashing behind the buttons, the battery in the remote may need changing.
Other indications that the battery may need to be changed include only being able to operate the shades from a close distance. The remote should operate the shades within 100 feet; however, if the battery needs changing, this distance will be shorter.
The remote uses a CR2450 battery, available at most hardware or general stores.
Remove the back from the remote and pry the battery carefully out of the fitting. Push the new battery in until it clicks, then replace the back cover on the remote.
If you need to Change Motor Speed, Copy a Remote, Turn the LED On/Off, or Turn Soft Stop On/Off, please see the article Dooya Advanced ProgrammingWas this article helpful?
That’s Great!
Thank you for your feedback
Sorry! We couldn't be helpful
Thank you for your feedback
Feedback sent
We appreciate your effort and will try to fix the article