Replacing a Chain Loop on a Roller Shade
Replacing the chain loop on a roller shade can be done by following the steps below.
Please note pliers and a pointed tool are recommended.
Step 1: Remove the Shade
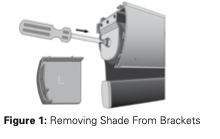
• Raise the shade completely, and then remove the end caps (if needed) from the cassette in order to access the clutch.
• Press on the spring-loaded idle end pin and remove the shade from its brackets [Figure 1].
Step 2: Take Clutch Casing Apart
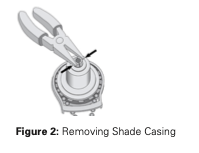
• Pull the clutch out of the shade tube.
• Use the pliers to press the two prongs in the center of the clutch together and pull off the casing [Figure 2]. This will expose the internal springs.
Step 3: Remove Old Chain
• Pull the chain loop up and through the chain guide.
• Pull the left side of the chain up and away from the clutch.
• Now pull the right side of the chain counter-clockwise in order to spin the clutch and free the chain [Figure 3].

Step 4: Install New Chain
• Insert part of the chain into the bottom of the clutch [Figure 4].
• Pull the chain counter-clockwise to spin the clutch until the chain is fully in place.
• Finally, pull the chain loop back through the bottom tab on the clutch [Figure 5].

Step 5: Replace the Clutch Casing
• Replace the clutch casing by lining up the channel on the casing with the spring of the clutch [Figure 6].
• Press firmly down on the clutch casing to snap it into place [Figure 7].

Step 6: Reinstall the Clutch
• Reinstall the clutch into the shade tube by sliding it into place [Figure 8].
• The channels of the clutch and the tube must align in order for the clutch to fit into place.

Step 7: Reinstall the Shade
• Reinstall your shade to the brackets by sliding the clutch side of the shade onto the metal shelf of the control side bracket.
• Lock the shade in place by pushing in the spring loaded pin and inserting into the idle end bracket.
• If you are working with a shade in a cassette, reinstall the cassette end caps, and install your shade into the cassette brackets.
Step 8: Adjust Stop Beads
• Once the shade is installed, add the stop beads to the chain at your desired upper and lower stop positions.
• Determine your stop limits by raising and lowering the shade. Once the shade reaches your desired positions, install the stop beads.
Step 9: Reinstall Chain Tensioner
• Please refer to the Tensioner Installation Instruction sheet.
Cord Tensioner Installation - Coulisse
NOTE: The chain tensioner forms an important safety function by keeping chain loops away from small children. Never operate this shade without a functioning and correctly installed chain tensioner.
Last Updated: 4/30/2025
Was this article helpful?
That’s Great!
Thank you for your feedback
Sorry! We couldn't be helpful
Thank you for your feedback
Feedback sent
We appreciate your effort and will try to fix the article